Table of Contents
Automating your catalogs
Catalogs, price lists and brochures with repeated page layouts can often be created in a very efficient manner using automation software.
If you currently complete your catalog, price list or brochures page-by-page using Adobe InDesign, Quark Xpress, Microsoft Word, Excel or another tool – or you’re looking to create a PDF or printed catalog for the first time – an automated catalog production workflow can simultaneously improve your catalog while reducing cost and production time.
This guide will explain the various initial steps to help you create your first automated catalog. It demonstrates how to get started and walks you through creating a simple example. At the end of this guide you will be able to create simple automated pages using the data and templates supplied as shown in this video.
The various resources used within this guide are available for download in our Getting Started – Automation Resources pack. Once you have downloaded this pack, unzip it to a known location (e.g. your Desktop or Documents folder). You will need to know where this folder is located as you move through this guide.
We have assumed that you’re already using Adobe InDesign. If you’re completely new to catalog production and you don’t have InDesign then you may like to also read our Downloading and installing Adobe InDesign guide.
How EasyCatalog works
EasyCatalog creates content by combining your product data source with a standard product layout – similar to mail merging a letter.
EasyCatalog requires hierarchical data in order to create the various category and product hierarchies typically found within a catalog.
Sample page layouts
An automated catalog solution is able to create many different page and chapter layouts, as well as fully integrated tables of contents, indexes and other cross references.
In general terms, automated catalogs repeat a similar layout on each page – though this can be customised and extended depending on your particular requirements.
-
- Components
-
- Office
-
- Supplies
-
- Wholesale
-
- Tools
-
- Supermarket
-
- Alphabetical Price Index
-
- Brand Index
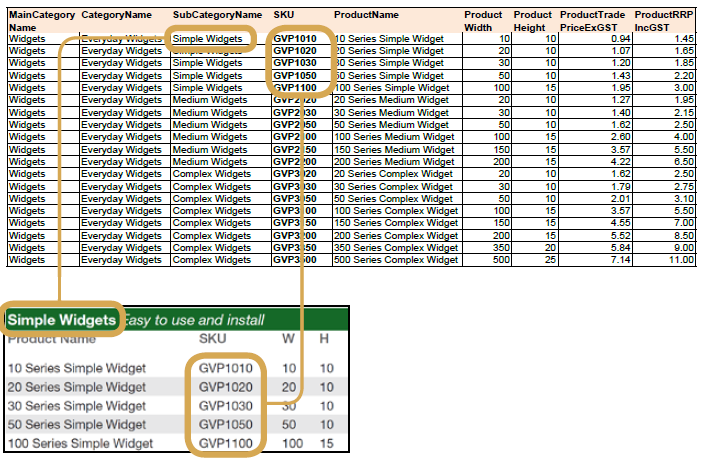
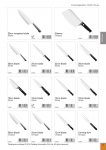
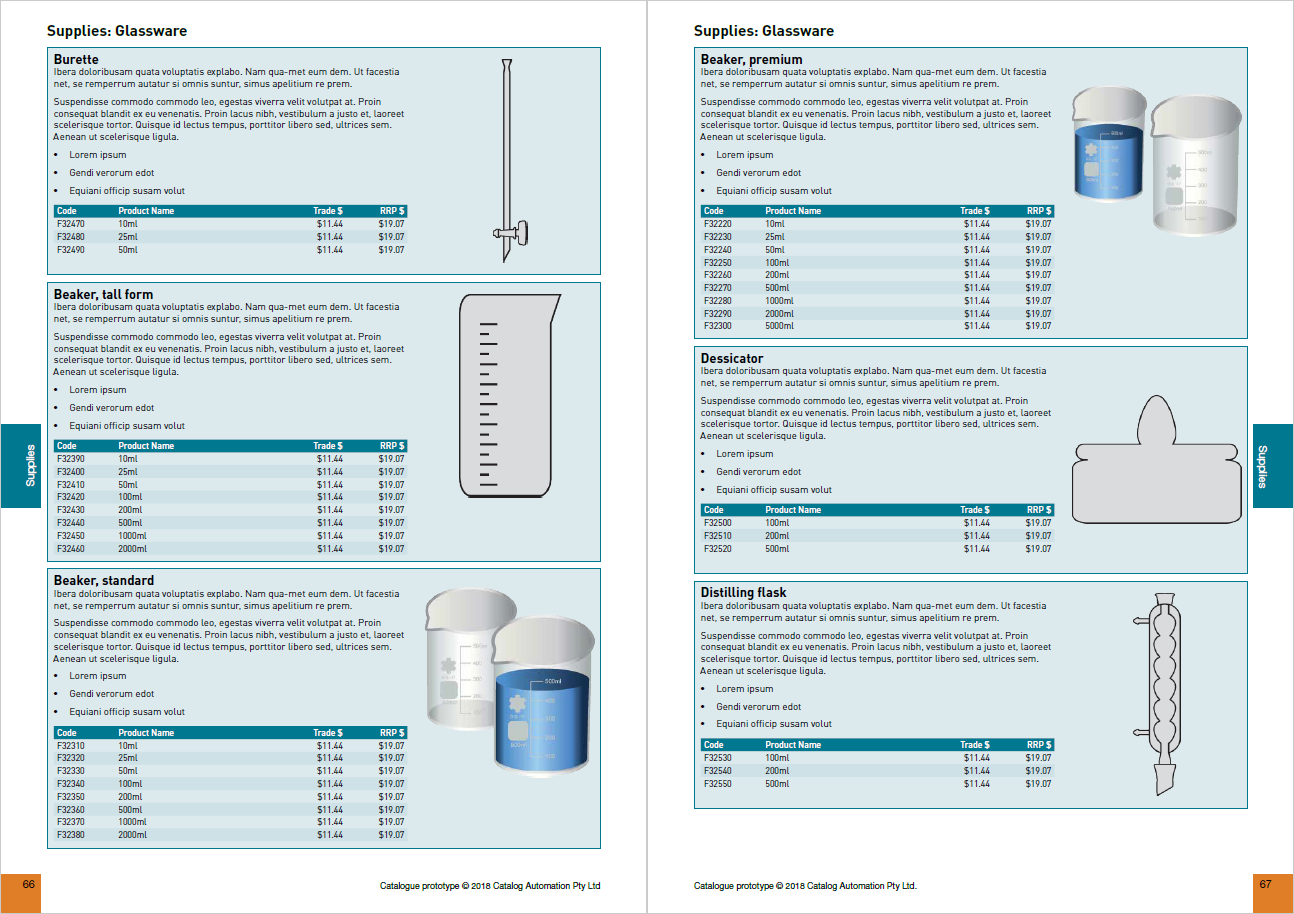
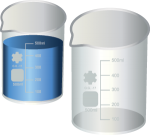
This worked example uses a standard layout as shown below. While the example shown is for laboratory supplies it is suitable for catalogs where multiple product sizes and options are available under different product groupings including office products, homewares, school resources, building hardware, automotive supplies and wholesale foods.
Installing the EasyCatalog trial
Downloading the software
EasyCatalog is available for download from the 65bit Software website. You will need to provide a valid email address as the download location will be emailed to you.
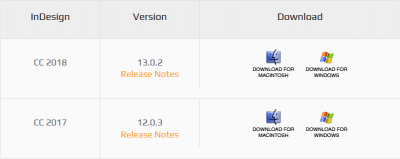
Choose the correct operating system and version of Adobe InDesign / Creative Cloud.
Installing the software
Double click on the file you have just downloaded. Look for a file similar to EasyCatalog CC 2018 13.0.2 Installer.zip in your Downloads directory.
Then double click on the file EasyCatalog CC2018.exe (Windows) or EasyCatalog CC 2018 13.0.2 Installer.pkg (Mac) to start the installer.
Choose the “Install” button and proceed with all of the default options. EasyCatalog will be installed in your InDesign Plugins folder, and new menu items will be created on the “File” and “Window” menu.
For more detailed installation instructions please read our Detailed instructions for installing EasyCatalog guide.
If you have already installed EasyCatalog and your 30-day trial has expired please contact us.
Product Data
Creating automated catalogs requires a comprehensive and consistent data source which contains both product information (e.g. product name, product height, product width, product price) and publishing information (e.g. product grouping, choice of templates).
Product Information
Product information is often sourced from existing business software such as an ERP system, accounting system, website content management system or a specialised product information management system.
Product information is typically exported as a CSV or Excel file and includes one spreadsheet row for each product contained within the catalog.
Publishing Information
Publishing information comprises additional information used to assist in the assembly of a catalog. This includes details on how product are grouped (e.g. where a product comes in 5mL, 10mL, 25mL, 50mL, 100mL capacity); which products are shown bigger/in more detail on the page; and how chapters may be organised and coloured to aid user navigation.
Often this information is not by default included within an ERP, accounting, content management or product information management solution – in some instances it may be very difficult to easily include the information required. For more information refer our detailed Does your product management system suit automated catalog production? guide.
Product Images
Product images, technical drawings, logos and other graphics can be managed as part of an automated catalog production workflow.

The Getting Started download pack contains 34 product images within the Product images folder.
For more information please read our Managing product images for your catalog guide.
Installing the sample EasyCatalog Panel
Copying the sample EasyCatalog Panel
Open the Getting Started – Automation Resources folder you have already saved to your Desktop or Documents folder.
Copy the entire Catalog Automation Sample Data folder to your EasyCatalog Workspace folder. The EasyCatalog Workspace folder is created when you first installed EasyCatalog and is typically located in your Documents folder.
If you’re not sure how to find your EasyCatalog Workspace folder, please refer to our Managing EasyCatalog preferences guide for more information.
Creating the EasyCatalog Panel
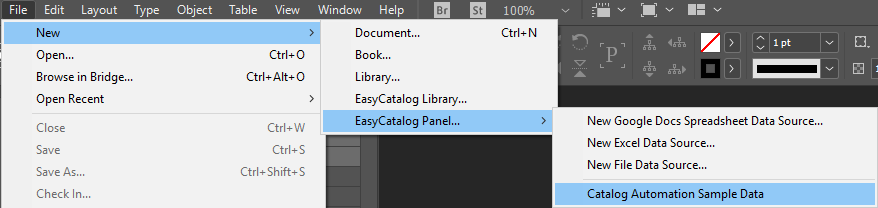
Go to File > New > EasyCatalog Panel and choose Catalog Automation Sample Data. If there is no option to create a panel named Catalog Automation Sample Data then go back and check that you have copied the whole Catalog Automation Sample Data folder into your EasyCatalog Workspace folder.
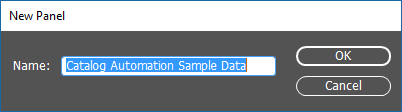
Accept the default name for the panel.
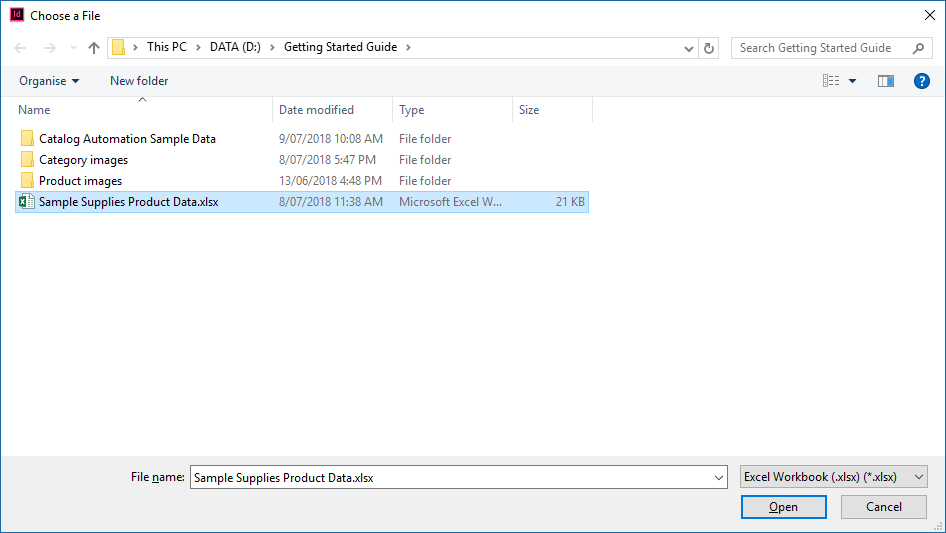
You may be prompted to link to the spreadsheet containing the product data.

Navigate to the Getting Started – Automation Resources folder and select the Sample Supplies Product Data Excel file.
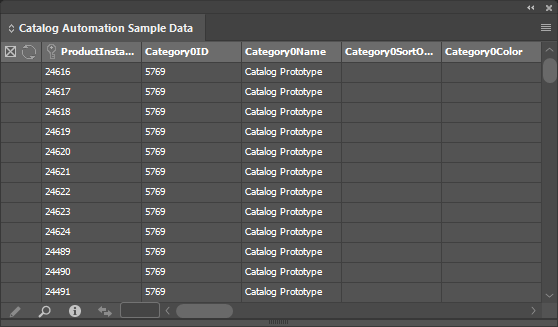
The EasyCatalog Panel will now load. The panel should display rows of product data as shown.
Grouping data
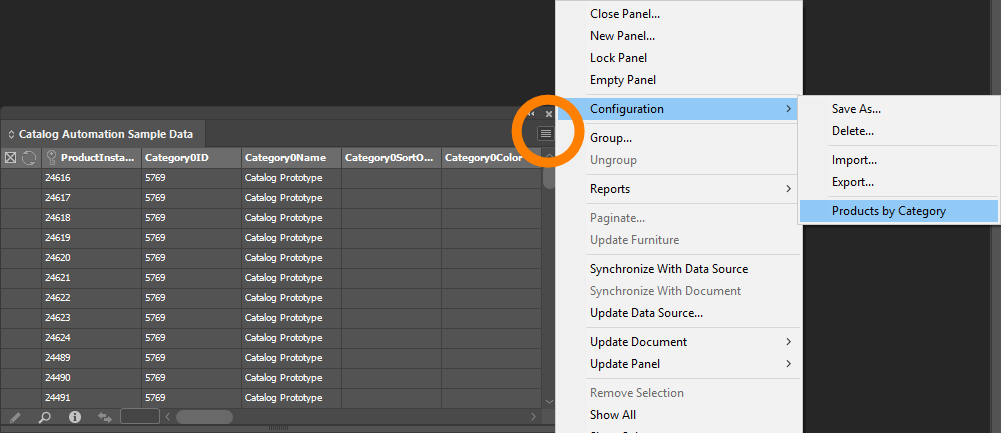
The product data loaded will be shown as an unstructured table. To organise the data by product category choose Configuration > Products by Category from the EasyCatalog Panel flyout menu.
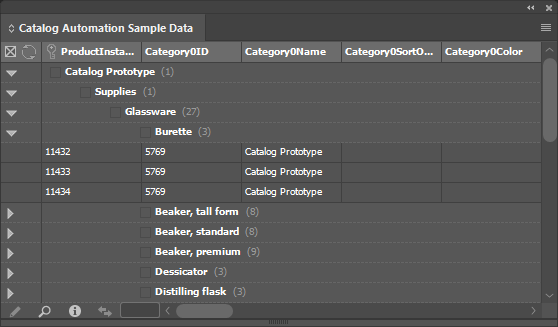
The product data will now be arranged by category. You can expand and contract the hierarchy by clicking on the arrows to the left of the panel.
Updating image location
To link to the product images you will need to tell EasyCatalog where your image folder is located.
Use the scroll bars on the Catalog Automation Sample Data panel to find the Category2Name field. Right-click on the Category2Name field and choose Field Options.

Choose Picture Content on the left menu and then edit the Folder location value by clicking Choose. Navigate to the Getting Started – Automation Resources folder and select the Category images folder.
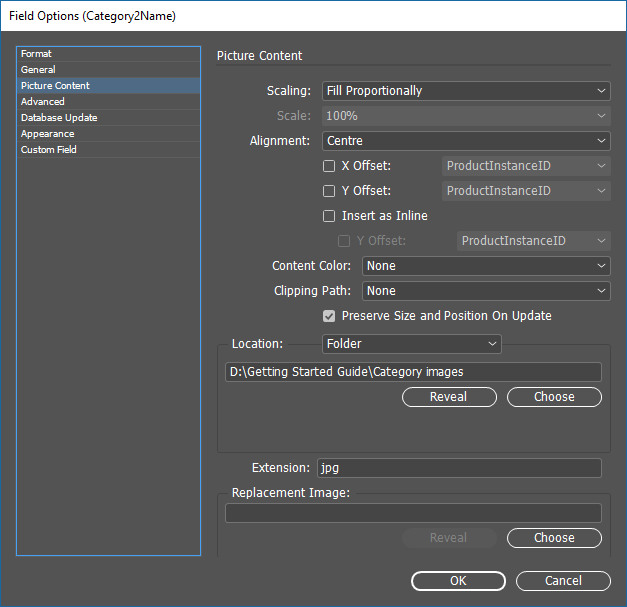
This will allow EasyCatalog to associate your image files with the value contained in the Picture Options field. If you move your mouse over one of the image names a preview image should display.
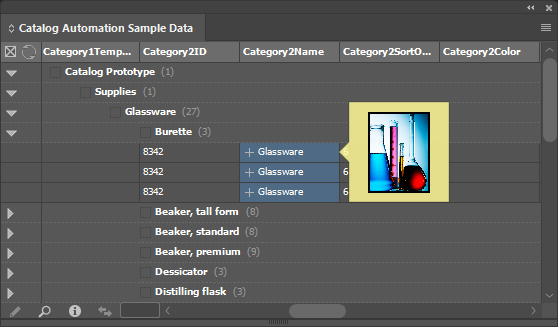
Repeat the process for the CollectionCategoryImage1 field, this time choosing the Product images folder.

Your EasyCatalog Panel is now ready to use.
Understanding the sample InDesign Template
Open the Sample Supplies Catalog.indd file from inside the Getting Started – Automation Resources folder you have already saved to your Desktop or Documents folder. (If you are using an earlier version of InDesign choose Sample Supplies Catalog.idml.)
This file has been pre-configured to allow you to easily create your first catalog with EasyCatalog. Use the options on the Adobe InDesign Window menu to display these items as required.
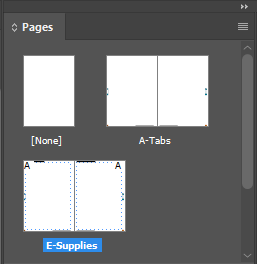
Master pages
[Go to Window > Pages]
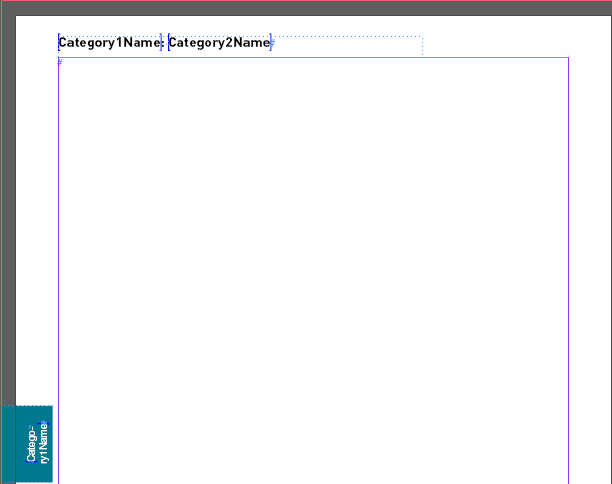
Go to the E-Supplies master page, which contains the master text frame required for automated page creation. It also inherits navigation tabs and other page furniture from the A-Tabs master.
Paragraph styles
[Go to Window > Styles > Paragraph styles]
Paragraph styles are used extensively to facilitate the easy updating of text specifications (e.g. font, font size, spacing, bullets, etc).

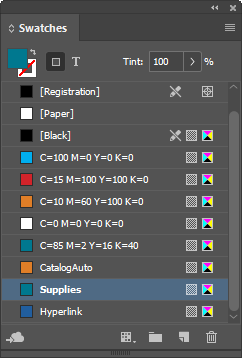
Colour swatches
[Go to Window > Color > Swatches]
Colour swatches are pre-saved to allow table cells to be coloured automatically.
Breadcrumbs and navigation tabs are controlled on the master page using EasyCatalog’s Page Furntiture setup.
Opening the sample EasyCatalog Library
To open the EasyCatalog library, choose File > Open and navigate to the Getting Started – Automation Resources folder. Open the Sample Supplies Library.indl file.
The EasyCatalog library has been kept very simple, with elements created at the Category2 and Collection levels.
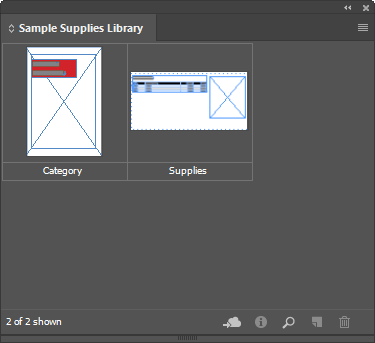
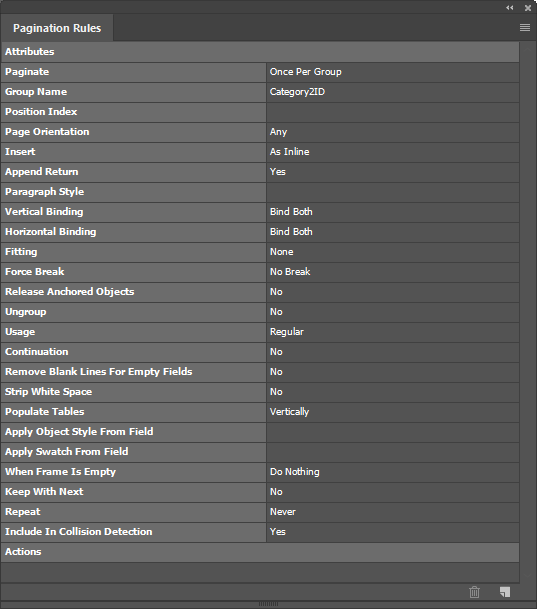
Category2 library element
The Category2 library element comprises a full page text box containing an anchored image box which fills the whole page with a category image.

The element is controlled by the pagination rules applied to the contents.
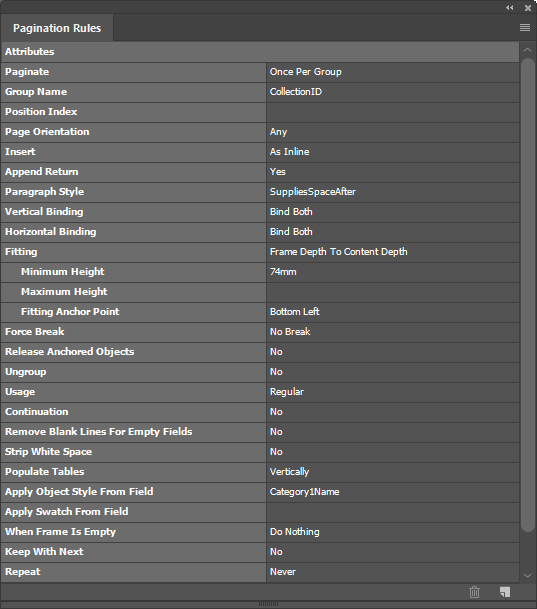
Collection library element
The Collection library element comprises a text box containing a heading, description text, an image and a four-column table.
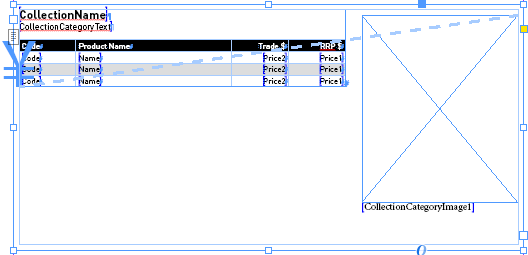
The element is controlled by the pagination rules applied to the contents.
For more information on creating and editing EasyCatalog libraries refer to our Creating and editing your EasyCatalog library guide.
Creating automated catalog pages
Using “Paginate” from the EasyCatalog Panel
Drag the E-Supplies master page within the Pages panel to create page 65.
Override the text frame on the newly created page 65 by Ctrl-Alt-clicking (Windows) or Ctrl-Option-clicking (Mac).
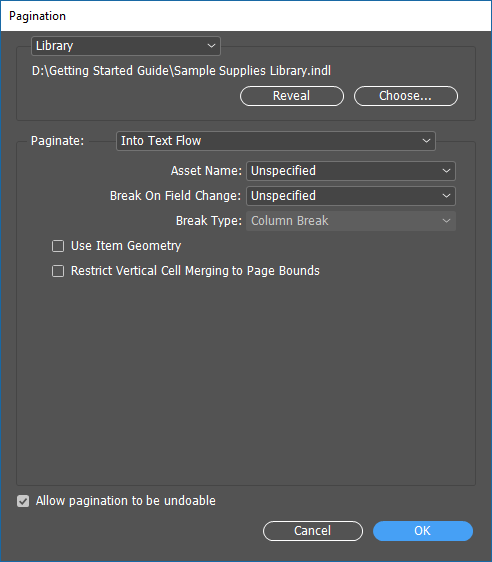
Select your required product data and choose Paginate from the EasyCatalog Panel flyout menu.
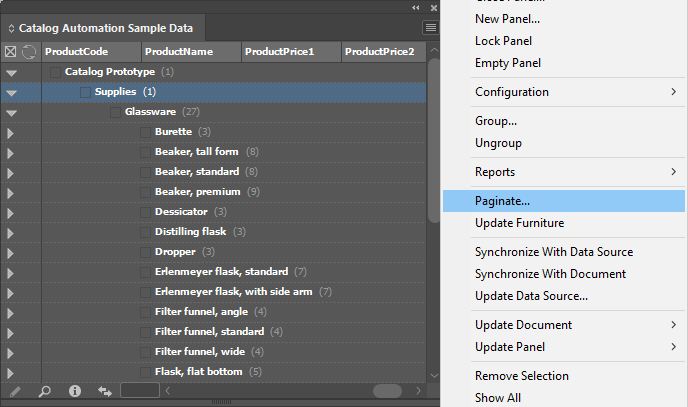
Select the Sample Supplies Library.indl library file. Ensure the Asset Name and Break On Field Change drop-downs are set to Unspecified as shown.
View more information in the Create pages automatically using the EasyCatalog Pagination Module guide.
Updating Page Furniture
The final step is to update the page navigation headings and tabs. These objects are conditionally set based on the content appearing on the page.
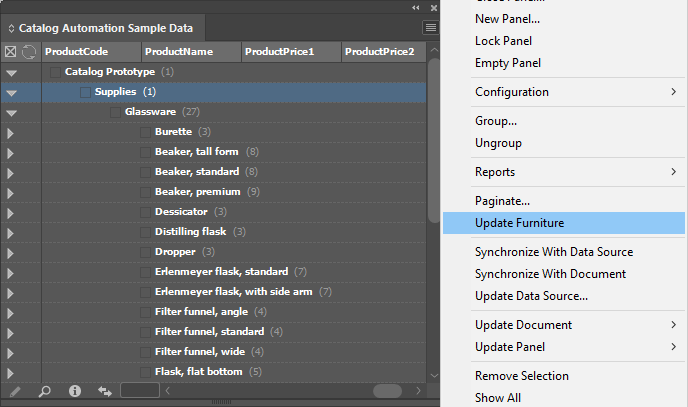
View more information in the Enhancing your page navigation with Page Furniture guide.
Congratulations, you have now automated your first catalog pages using EasyCatalog.